懒人李冰

记录我的生活、学习

FFMpeg 实现视频编码、解码、封装、解封装、转码、缩放

FFMpeg 作为音视频领域的开源工具,它几乎可以实现所有针对音视频的处理,本文主要利用 FFMpeg 官方提供的 SDK 实现音视频最简单的几个实例:编码、解码、封装、解封装、转码、缩放以及添加水印。

接下来会由发现问题->分析问题->解决问题->实现方案,循序渐进的完成。

参考代码:ffmpeg_sdk

FFMpeg 编码实现

本例子实现的是将视频域 YUV 数据编码为压缩域的帧数据,编码格式包含了 H.264/H.265/MPEG1/MPEG2 四种 CODEC 类型。 实现的过程,可以大致用如下图表示:

从图中可以大致看出视频编码的流程:

  • 首先要有未压缩的 YUV 原始数据。
  • 其次要根据想要编码的格式选择特定的编码器。
  • 最后编码器的输出即为编码后的视频帧。

根据流程可以推倒出大致的代码实现:

  • 存放待压缩的 YUV 原始数据。此时可以利用 FFMpeg 提供的 AVFrame 结构体,并根据 YUV 数据来填充 AVFrame 结构的视频宽高、像素格式;根据视频宽高、像素格式可以分配存放数据的内存大小,以及字节对齐情况。
  • 获取编码器。利用想要压缩的格式,比如 H.264/H.265/MPEG1/MPEG2 等,来获取注册的编解码器,编解码器在 FFMpeg 中用 AVCodec 结构体表示,对于编解码器,肯定要对其进行配置,包括待压缩视频的宽高、像素格式、比特率等等信息,这些信息,FFMpeg 提供了一个专门的结构体 AVCodecContext 结构体。
  • 存放编码后压缩域的视频帧。FFMpeg 中用来存放压缩编码数据相关信息的结构体为 AVPacket。最后将 AVPacket 存储的压缩数据写入文件即可。

AVFrame 结构体的分配使用av_frame_alloc()函数,该函数会对 AVFrame 结构体的某些字段设置默认值,它会返回一个指向 AVFrame 的指针或 NULL指针(失败)。AVFrame 结构体的释放只能通过av_frame_free()来完成。注意,该函数只能分配 AVFrame 结构体本身,不能分配它的 data buffers 字段指向的内容,该字段的指向要根据视频的宽高、像素格式信息手动分配,本例使用的是av_image_alloc()函数。代码实现大致如下:

1
2
3
4
5
6
7
8
9
10
11
12
13
14
15
16
17
18
19
20
21
22
23
24
//allocate AVFrame struct
AVFrame *frame = NULL;
frame = av_frame_alloc();
if(!frame){
	printf("Alloc Frame Fail\n");
	return -1;
}

//fill AVFrame struct fields
frame->width = width;
frame->height = height;
frame->pix_fmt = AV_PIX_FMT_YUV420P;

//allocate AVFrame data buffers field point
ret = av_image_alloc(frame->data, frame->linesize, frame->width, frame->height, frame->pix_fmt, 32);
if(ret < 0){
	printf("Alloc Fail\n");
	return -1;
}

//write input file data to frame->data buffer
fread(frame->data[0], 1, frame->width*frame->height, pInput_File);
...
av_frame_free(frame);

编解码器相关的 AVCodec 结构体的分配使用avcodec_find_encoder(enum AVCodecID id)完成,该函数的作用是找到一个与 AVCodecID 匹配的已注册过得编码器;成功则返回一个指向 AVCodec ID 的指针,失败返回 NULL 指针。该函数的作用是确定系统中是否有该编码器,只是能够使用编码器进行特定格式编码的最基本的条件,要想使用它,至少要完成两个步骤:

  1. 根据特定的视频数据,对该编码器进行特定的配置;
  2. 打开该编码器。

针对第一步中关于编解码器的特定参数,FFMpeg 提供了一个专门用来存放 AVCodec 所需要的配置参数的结构体 AVCodecContext 结构。它的分配使用avcodec_alloc_context3(const AVCodec *codec)完成,该函数根据特定的 CODEC 分配一个 AVCodecContext 结构体,并设置一些字段为默认参数,成功则返回指向 AVCodecContext 结构体的指针,失败则返回 NULL 指针。分配完成后,根据视频特性,手动指定与编码器相关的一些参数,比如视频宽高、像素格式、比特率、GOP 大小等。最后根据参数信息,打开找到的编码器,此处使用avcodec_open2()函数完成。代码实现大致如下:

1
2
3
4
5
6
7
8
9
10
11
12
13
14
15
16
17
18
19
20
21
22
23
24
25
26
27
28
29
AVCodec *codec = NULL;
AVCodecContext *codecCtx = NULL;

//register all encoder and decoder
avcodec_register_all();

//find the encoder
codec = avcodec_find_encoder(codec_id);
if(!codec){
	printf("Could Not Find the Encoder\n");
	return -1;
}

//allocate the AVCodecContext and fill it's fields
codecCtx = avcodec_alloc_context3(codec);
if(!codecCtx){
	printf("Alloc AVCodecCtx Fail\n");
	return -1;
}

codecCtx->bit_rate = 4000000;
codecCtx->width    = frameWidth;
codecCtx->height   = frameHeight;
codecCtx->time_base= (AVRational){1, 25};

//open the encoder
if(avcodec_open2(codecCtx, codec, NULL) < 0){
	printf("Open Encoder Fail\n");
}

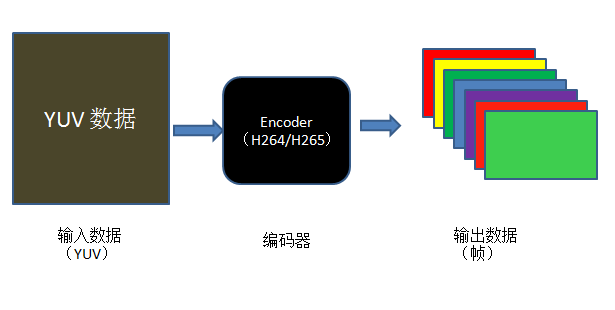
存放编码数据的结构体为 AVPacket,使用之前要对该结构体进行初始化,初始化函数为av_init_packet(AVPacket *pkt),该函数会初始化 AVPacket 结构体中一些字段为默认值,但它不会设置其中的 data 和 size 字段,需要单独初始化,如果此处将 data 设为 NULL、size 设为 0,编码器会自动填充这两个字段。

有了存放编码数据的结构体后,我们就可以利用编码器进行编码了。FFMpeg 提供的用于视频编码的函数为avcodec_encode_video2,它作用是编码一帧视频数据,该函数比较复杂,单独列出如下:

1
2
int avcodec_encode_video2(AVCodecContext *avctx, AVPacket *avpkt,
                          const AVFrame *frame, int *got_packet_ptr);

它会接收来自 AVFrame->data 的视频数据,并将编码数据放到 AVPacket->data 指向的位置,编码数据大小为 AVPacket->size。

其参数和返回值的意义:

  • avctx: AVCodecContext 结构,指定了编码的一些参数;
  • avPkt: AVPacket对象的指针,用于保存输出的码流;
  • frame:AVFrame结构,用于传入原始的像素数据;
  • got_packet_ptr:输出参数,用于标识是否已经有了完整的一帧;
  • 返回值:编码成功返回 0, 失败返回负的错误码;

编码完成后就可将AVPacket->data内的编码数据写到输出文件中;代码实现大致如下:

1
2
3
4
5
6
7
8
9
10
11
12
13
14
15
16
17
AVPacket pkt;

//init AVPacket
av_init_packet(&pkt);
pkt.data = NULL;
pkt.size = 0;

//encode the image
ret = avcodec_encode_video2(codecCtx, &pkt, frame, &got_output);
if(ret < 0){
	printf("Encode Fail\n");
	return -1;


if(got_output){
	fwrite(pkt.data, 1, pkt.size, pOutput_File);
}

编码的大致流程已经完成了,剩余的是一些收尾工作,比如释放分配的内存、结构体等等。

完整实现请移步编码实现

FFMpeg 解码实现

解码实现的是将压缩域的视频数据解码为像素域的 YUV 数据。实现的过程,可以大致用如下图所示。

从图中可以看出,大致可以分为下面三个步骤:

  • 首先要有待解码的压缩域的视频。
  • 其次根据压缩域的压缩格式获得解码器。
  • 最后解码器的输出即为像素域的 YUV 数据。

根据流程可以推倒出大致的代码实现:

  • 关于输入数据。首先,要分配一块内存,用于存放压缩域的视频数据;之后,对内存中的数据进行预处理,使其分为一个一个的 AVPacket 结构(AVPacket 结构的简单介绍如上面的编码实现)。最后,将 AVPacket 结构中的 data 数据给到解码器。
  • 关于解码器。首先,利用 CODEC_ID 来获取注册的解码器;之后,将预处理过得视频数据给到解码器进行解码。
  • 关于输出。FFMpeg 中,解码后的数据存放在 AVFrame 中;之后就将 AVFrame 中的 data 字段的数据存放到输出文件中。

对于输入数据,首先,通过 fread 函数实现将固定长度的输入文件的数据存放到一块 buffer 内。H.264中一个包的长度是不定的,读取固定长度的码流通常不可能刚好读出一个包的长度;对此,FFMpeg 提供了一个 AVCoderParserContext 结构用于解析读到 buffer 内的码流信息,直到能够取出一个完整的 H.264 包。为此,FFMpeg 提供的函数为av_parser_parse2,该函数比较复杂,定义如下:

1
2
3
4
5
6
7

int av_parser_parse2(AVCodecParserContext *s,
                     AVCodecContext *avctx,
                     uint8_t **poutbuf, int *poutbuf_size,
                     const uint8_t *buf, int buf_size,
                     int64_t pts, int64_t dts,
                     int64_t pos);

函数的参数和返回值含义如下:

  • AVCodecParserContext *s:初始化过的 AVCodecParserContext 对象,决定了码流该以怎样的标准进行解析;
  • AVCodecContext *avctx:预先定义好的 AVCodecContext 对象;
  • uint8_t **poutbuf:AVPacket::data 的地址,保存解析完成的包数据。
  • int *poutbuf_size:AVPacket 的实际数据长度,如果没有解析出完整的一个包,该值为 0;
  • const uint8_t *but:待解码的码流的地址;
  • int buf_size:待解码的码流的长度;
  • int64_t pts, int64_t dts:显示和解码的时间戳;
  • int64_t pos:码流中的位置;
  • 返回值为解析所使用的比特位的长度;

FFMpeg 中为我们提供的该函数常用的使用方式为:

1
2
3
4
5
6
7
8
9
while(in_len){
	len = av_parser_parse2(myparser. AVCodecContext, &data, &size, in_data, in len, pts, dts, pos);

	in_data += len;
	in_len  -= len;

	if(size)
		decode_frame(data, size);
}

如果参数poutbuf_size的值为0,那么应继续解析缓存中剩余的码流;如果缓存中的数据全部解析后依然未能找到一个完整的包,那么继续从输入文件中读取数据到缓存,继续解析操作,直到pkt.size不为0为止。

因此,关于输入数据的处理,代码大致如下:

1
2
3
4
5
6
7
8
9
10
11
12
13
14
15
16
17
18
19
20
21
22
23
24
25
26
//open input file
FILE *pInput_File = fopen(Input_FileName, "rb+");
if(!pInput_File){
	printf("Open Input File Fail\n");
	return -1;
}

//read compressed bitstream form file to buffer
uDataSize = fread(inbuf, 1, INBUF_SIZE, pInput_File);
if(uDataSize == 0){	//decode finish
	return -1;
}

//decode the data in the buffer to AVPacket.data
while(uDataSize > 0){
	len = av_parser_parse2(pCodecParserCtx, codecCtx,
							&(pkt.data), &(pkt.size),
							pDataPtr, uDataSize,
							AV_NOPTS_VALUE, AV_NOPTS_VALUE,
							AV_NOPTS_VALUE);
	uDataSize -= len;
	uDataPtr  += len;

	if(pkt.size == 0) continue;
	decode_frame(pkt.data, pkt.size);
}

注意,上面提到的av_parser_parse2函数用的几个参数,其实是与具体的编码格式有关的,它们应该在之前已经分配好了,我们只是放到后面来讲一下,因为它们是与具体的解码器强相关的。


对于解码器。与上面提到的编码实现类似,首先,根据 CODEC_ID 找到注册的解码器 AVCodec,FFMpeg 为此提供的函数为avcodec_find_decoder();其次,根据找到的解码器获取与之相关的解码器上下文结构体 AVCodecC,使用的函数为编码中提到的avcodec_alloc_context3;再者,如上面提到的要获取完整的一个 NALU,解码器需要分配一个 AVCodecParserContext 结构,使用函数av_parser_init;最后,前面的准备工作完成后,打开解码器,即可调用 FFMpeg 提供的解码函数avcodec_decode_video2对输入的压缩域的码流进行解码,并将解码数据存放到 AVFrame->data 中。代码实现大致如下:

1
2
3
4
5
6
7
8
9
10
11
12
13
14
15
16
17
18
19
20
21
22
23
24
25
26
27
28
29
30
31
32
33
34
35
36
37
38
39
40
41
42
43
44
45
46
47
48
49
50
51
52
53
54
55
56
57
58
59
60
61
62
AVFrame *frame = NULL;
AVCodec *codec = NULL;
AVCodecContext *codecCtx = NULL;
AVCodecParserContext *pCodecParserCtx = NULL;

//register all encoder and decoder
avcodec_register_all();

//Allocate AVFrame to Store the Decode Data
frame = av_frame_alloc();
if(!frame){
	printf("Alloc Frame Fail\n");
	return -1;
}

//Find the  AVCodec Depending on the CODEC_ID
codec = avcodec_find_decoder(AV_CODEC_ID_H264);
if(!codec){
	printf("Find the Decoder Fail\n");
	return -1;
}

//Allocate the AVCodecContext 
codecCtx = avcodec_alloc_context3(codec);
if(!codecCtx){
	printf("Alloc AVCodecCtx Fail\n");
	return -1;
}

//Allocate the AVCodecParserContext 
pCodecParserCtx = av_parser_init(AV_CODEC_ID_H264);
if(!pCodecParserCtx){
	printf("Alloc AVCodecParserContext Fail\n");
	return -1;
}

//Open the Decoder
if(avcodec_open2(codecCtx, codec, NULL) < 0){
	printf("Could not Open the Decoder\n");
	return -1;
}

//read compressed bitstream form file to buffer
uDataSize = fread(inbuf, 1, INBUF_SIZE, pInput_File);
if(uDataSize == 0){	//decode finish
	return -1;
}

//decode the data in the buffer to AVPacket.data
while(uDataSize > 0){
	len = av_parser_parse2(pCodecParserCtx, codecCtx,
							&(pkt.data), &(pkt.size),
							pDataPtr, uDataSize,
							AV_NOPTS_VALUE, AV_NOPTS_VALUE,
							AV_NOPTS_VALUE);
	uDataSize -= len;
	uDataPtr  += len;

	if(pkt.size == 0) continue;
	//decode start
	avcodec_decode_video2(codecCtx, frame, &got_frame, pkt);
}

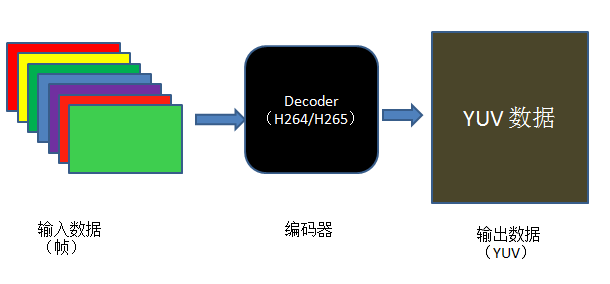
注意,上面解码的过程中,针对具体的实现,可能要做一些具体参数上的调整,此处只是理清解码的流程。


对于输出数据。解码完成后,解码出来的像素域的数据存放在 AVFrame 的 data 字段内,只需要将该字段内存放的数据之间写文件到输出文件即可。解码函数avcodec_decode_video2函数完成整个解码过程,对于它简单介绍如下:
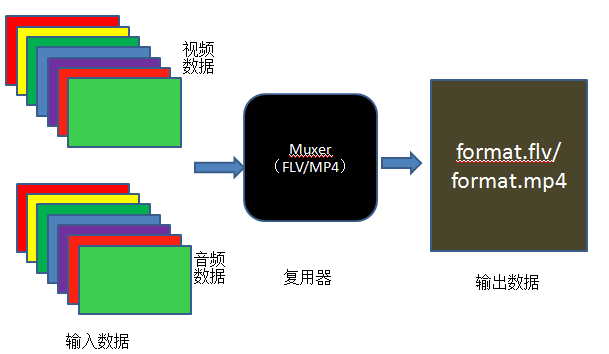
1
2
3
int avcodec_decode_video2(AVCodecContext *avctx, AVFrame *picture,
                         int *got_picture_ptr,
                         const AVPacket *avpkt);

该函数各个参数的意义:

  • AVCodecContext *avctx:编解码器上下文对象,在打开编解码器时生成;
  • AVFrame *picture: 保存解码完成后的像素数据;我们只需要分配对象的空间,像素的空间codec会为我们分配好;
  • int *got_picture_ptr: 标识位,如果为1,那么说明已经有一帧完整的像素帧可以输出了;
  • const AVPacket *avpkt: 前面解析好的码流包;

由此可见,当标识位为1时,代表解码一帧结束,可以写数据到文件中。代码如下:

1
2
3
4
5
6
7
8
9
pOutput_File = fopen(Output_FileName, "wb");
if(!pOutput_File){
	printf("Open Output File Fail\n");
	return -1;
}

if(*got_picture_ptr){
	fwrite(frame->data[0],1, Len, pOutput_File)
}

解码的大致流程已经完成了,剩余的是一些收尾工作,比如释放分配的内存、结构体等等。

完整实现请移步解码实现

FFMpeg 封装实现

本例子实现的是将视频数据和音频数据,按照一定的格式封装为特定的容器,比如FLV、MKV、MP4、AVI等等。实现的过程,可以大致用如下图表示:

从图中可以大致看出视频封装的流程:

  • 首先要有编码好的视频、音频数据。
  • 其次要根据想要封装的格式选择特定的封装器。
  • 最后利用封装器进行封装。

根据流程可以推倒出大致的代码实现:

  • 利用给定的YUV数据编码得到某种 CODEC 格式的编码视频(可以参见上面提到的编码实现),同样的方法得到音频数据。
  • 获取输出文件格式。获取输出文件格式可以直接指定文件格式,比如FLV/MKV/MP4/AVI等,也可以通过输出文件的后缀名来确定,或者也可以选择默认的输出格式。根据得到的文件格式,其中可能有视频、音频等,为此我们需要为格式添加视频、音频、并对格式中的一些信息进行设置(比如头)。
  • 利用设置好的音频、视频、头信息等,开始封装。

对于由 YUV 数据得到编码的视频数据部分,不再重复。直接看与 Muxer 相关的部分,与特定的 Muxer 相关的信息,FFMpeg 提供了一个 AVFormatContext 的结构体描述,并用avformat_alloc_output_context2()函数来分配它。该函数的声明如下:

1
2
int avformat_alloc_output_context2(AVFormatContext **ctx, AVOutputFormat *oformat,
                                   const char *format_name, const char *filename);

其中:

  • ctx:输出到 AVFormatContext 结构的指针,如果函数失败则返回给该指针为 NULL。
  • oformat:指定输出的 AVOutputFormat 类型,如果设为 NULL,则根据 format_name 和 filename 生成。
  • format_name:输出格式的名称,如果设为 NULL,则使用 filename 默认格式。
  • filename:目标文件名,如果不使用,可以设为 NULL。
  • 返回值:>=0 则成功,否则失败。

代码如下:

1
2
3
4
5
6
7
8
9
10
11
12
13
AVOutputFormat *fmt;
AVFormatContext *oc;

/* allocate the output media context */
avformat_alloc_output_context2(&oc, NULL, NULL, filename);
if (!oc) {
    printf("Could not deduce output format from file extension: using MPEG.\n");
    avformat_alloc_output_context2(&oc, NULL, "mpeg", filename);
}
if (!oc)
    return 1;

fmt = oc->oformat;

有了表示媒体文件格式的 AVFormatContext 结构后,就需要根据媒体格式来判断是否需要往媒体文件中添加视频流、音频流(有的媒体文件,这两种流并不是必须的);以 MP4 格式的媒体文件为例,我们需要一路视频流、一路音频流。因此需要创建一路流,FFMpeg 提供的创建流的函数为avformat_new_stream(),该函数完成向 AVFormatContext 结构体中所代码的媒体文件中添加数据流,函数声明如下:

1
AVStream *avformat_new_stream(AVFormatContext *s, const AVCodec *c);

其中:

  • s:AVFormatContext 结构,表示要封装生成的视频文件。
  • c:视频或音频流的编码器的指针。
  • 返回值:指向生成的 stream 对象的指针;失败则返回 NULL。

注意:对于 Muxer,该函数必须在调用avformat_write_header()前调用。使用完成后,需要调用avcodec_close()avformat_free_context()来清理由它分配的内容。

该函数调用完成后,一个新的 AVStream 便已经加入到输出文件中,下面就需要设置 stream 的 id 和 codec 等参数。以视频流为例,代码如下:

1
2
3
4
5
6
7
8
9
10
11
12
13
OutputStream *ost;
AVFormatContext *oc;
AVCodec **codec;
AVCodecContext *c;
AVStream *st;

st = avformat_new_stream(oc, *codec);
if(!st){
    fprintf(stderr, "Could not allocate stream\n");
    exit(1);
}
st->id = oc->nb_streams-1;
c = st->codec;

参数设置完成后,就可以打开编码器并为编码器分配必要的内存。步骤跟之前的类似,以视频为例,示例代码如下:

1
2
3
4
5
6
7
8
//open the codec
ret = avcodec_open(c, codec, &opt);
if(ret < 0){
    fprintf(stderr, "Could not open video codec: %s\n", av_err2str(ret));
    exit(1);
}
//allocate and init a re-usable frame
ost->frame = alloc_picture(c->pix_fmt, c->width, c->height);

接下来进行真正的封装:首先,为媒体文件添加头部信息,FFMpeg 为此提供的函数为avformat_write_header()。其次,将编码好的音视频 AVPacket 包添加到媒体文件中去,FFMpeg 为此提供的函数为av_interleaved_write_frame()。最后,写入文件尾的数据,FFMpeg 为此提供的函数为av_write_trailer()

封装的大致流程已经完成了,剩余的是一些收尾工作,比如释放分配的内存、结构体等等。

完整实现请移步封装实现

FFMpeg 解封装实现

本例子实现的是将音视频分离,例如将封装格式为 FLV、MKV、MP4、AVI 等封装格式的文件,将音频、视频分离开来。 实现的过程,可以大致用如下图表示:

从图中可以看出大致的节封装流程:

  • 首先要对解复用器进行初始化。
  • 其次将输入的封装格式文件给到解复用器内。
  • 最后利用解封装对 Container 进行解封装。

根据流程可以推到出大致的代码流程:

  • 首先对输入文件(Container 文件)、输出文件(Video/Audio 进行处理),方便后面的使用;
  • 其次打开输入文件,并分配 Format Context,从输入文件中得到流信息
  • 之后打开视频、音频编码器 Context,针对视频数据,分配图像 image。
  • 分配 frame 结构,初始化 packet,从输入文件中读取 frame 信息,并之后进行解码 packet。
  • 最后释放各种分配的数据信息。

在音视频分离后,需要将分离出的音视频分别放到不同的输出文件中,为此,需要打开文件以备后用。

1
2
3
4
5
6
7
8
static const char *video_dst_filename = NULL;
static const char *audio_dst_filename = NULL;
static FILE *video_dst_file = NULL;
static FILE *audio_dst_file = NULL;
video_dst_filename = argv[2];
audio_dst_filename = argv[3];
video_dst_file = fopen(video_dst_filename, "wb+");
audio_dst_file = fopen(audio_dst_filename, "wb+");

对于给定的需要 AV 分离的输入文件,使用avformat_open_input打开输入文件,并分配AVFormatContext结构。该函数的声明如下:

1
int avformat_open_input(AVFormatContext **ps, const char *filename, AVInputFormat *fmt, AVDictionary **options);

其中:

  • ps:指向由用户提供的AVFormatContext结构体,该结构体通过avformat_alloc_context分配,如果它是一个 NULL,该结构在此函数内分配并负值给 ps。
  • filename:指向需要打开的流的名称。
  • fmt:如果是 non-NULL,该参数指定输入的文件格式,否则输入文件的格式自动根据文件本身自动获取。
  • options:此处可以为 NULL。
  • 返回值:成功返回0,否则返回 AVERROR。

实现代码如下:

1
2
3
4
5
6
7
8
9
10
11
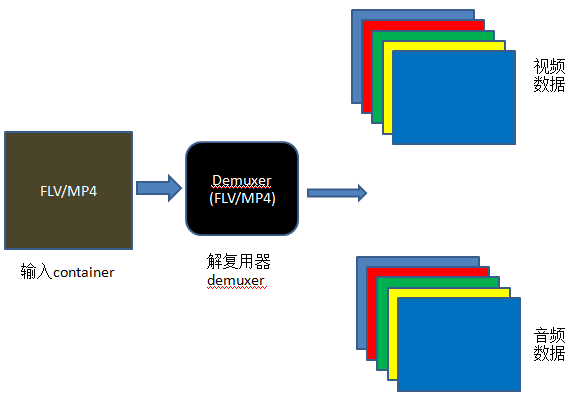
//open input file, and allocate format context
if(avformat_open_input(&fmt_ctx, src_filename, NULL, NULL) < 0){
    fprintf(stderr, "Could not open source file %s\n", src_filename);
    exit(1);
}

//retrive stream information
if(avformat_find_stream_info(fmt_ctx, NULL) < 0){
    fprintf(stderr, "Could not find stream information\n");
    exit(1);
}

通过输入文件分配好AVFormatContext后,需要找到里面的音频流和视频流,此处需要用到的函数为av_find_best_stream; 之后要根据找到的不同的流(如H264流、HEVC流等)找到特定的编解码器,此处使用avcodec_find_decoder;找到了解码器后, 就需要打开解码器,此处使用avcodec_open2函数完成。下面分别介绍这几个函数的使用:

av_find_best_stream函数定义如下:

1
int av_find_best_stream(AVFormatContext *ic, enum AVMediaType type, int wanted_stream_nb, int related_stream, AVCodec **decoder_ret, int flags);

其中:

  • ic:媒体文件句柄。
  • type:媒体类型,视频、音频、文本等。
  • wanted_stream_nb:用户请求的流,-1 代表自动选择。
  • related_stream:尝试找到相关流,如果没有就设为-1。
  • decoder_ret:如果是non-NULL,返回选定的流的解码器。
  • flags:此处定位0。
  • 返回值:成功返回非负值,如果找不到指定的请求类型的流,就返回AVERROR_STREAM_NOT_FOUND;如果找到了流,但没找到对应的解码器,就返回AVERROR_DECODER_NOT_FOUND

avcodec_find_decoder函数定义如下:

1
AVCodec *avcodec_find_decoder(enum AVCodecID id);

该函数参数为AVCodecID指定了请求的解码器,成功返回解码器,否则返回 NULL。

avcodec_open2函数定义如下:

1
int avcodec_open2(AVCodecContext *avctx, const AVCodec *codec, AVDictionary **options);

其中:

  • avctx:即将初始化的AVCodecContext结构体。
  • codec:打开的解码器,如果它是non-NULL codec,并在之前传递给了avcodec_alloc_context3avcodec_get_context_defaults3,该参数必须为 NULL 或之前传递的 CODEC。
  • Options:此处我们设置为 NULL。
  • 返回值:成功返回0,出错返回一个负值。

该函数的主要作用是根据给定的AVCodec初始化AVCodecContext,在使用该函数之前,待初始化的AVCodecContext结构需要先使用avcodec_alloc_context3分配好。其中的参数 AVCodec可以通过avcodec_find_decoder_by_nameavcodec_find_encoder_by_nameavcodec_find_decoderavcodec_find_endcoder来获取。在进行真正的解码之前,必须调用该函数。 下面给出使用的示例:

1
2
3
4
5
6
7
8
9
avcodec_register_all();
av_dict_set(&opts, "b", "2.5M", 0);
codec = avcodec_find_decoder(AV_CODEC_ID_H264);
if(!codec)
    exit(1);

context = avcodec_alloc_context3(codec);
if(avcodec_open2(context, codec, opts) < 0)
    exit(1);

对于上面分析的部分,我们将其封装在一个函数里,代码如下:

1
2
3
4
5
6
7
8
9
10
11
12
13
14
15
16
17
18
19
20
21
22
23
24
25
26
27
28
29
30
31
32
33
34
35
static int open_codec_context(int *stream_idx,
                              AVFormatContext *fmt_ctx,
                              enum AVMediaType type)
{
    int ret, stream_index;
    AVStream *pStream;
    AVCodecContext *codec_ctx = NULL;
    AVCodec *codec;

    ret = av_find_best_stream(fmt_ctx, type, -1, -1, NULL, 0);
    if(ret < 0){
        fprintf(stderr, "Could not find %s stream in input file '%s'\n",
                av_get_media_type_string(type), src_filename);
    }else{
        stream_index = ret;
        pStream = fmt_ctx->streams[stream_index];

        //find decoder for the stream
        codec_ctx = pStream->codec;
        codec = avcodec_find_decoder(codec_ctx->codec_id);
        if(!codec){
            fprintf(stderr, "Failed to find %s codec\n",
                    av_get_media_type_string(type));
            return AVERROR(EINVAL);
        }

        //open the decoder
        if((ret = avcodec_open2(codec_ctx, codec, NULL))< 0){
            fprintf(stderr, "Failed to open %s codec\n",
                    av_get_media_type_string(type));
            return ret;
        }
    }
    *stream_idx = stream_index;
}

针对音频、视频,分别调用该函数,示例代码如下:

1
2
3
4
5
6
7
8
9
10
11
12
13
14
15
16
17
18
19
20
21
    if(open_codec_context(&video_stream_idx, fmt_ctx, AVMEDIA_TYPE_VIDEO) >= 0){
        video_stream    = fmt_ctx->streams[video_stream_idx];
        video_codec_ctx = video_stream->codec;

        //allocate image where the decoded image will be put
        width   = video_codec_ctx->width;
        height  = video_codec_ctx->height;
        pix_fmt = video_codec_ctx->pix_fmt;
        ret = av_image_alloc(video_dst_data, video_dst_linesize,
                             width, height, pix_fmt, 1);
        if(ret < 0){
            fprintf(stderr, "Could not allocate raw video buffer\n");
            exit(1);
        }
        video_dst_bufsize = ret;
    }

    if(open_codec_context(&audio_stream_idx, fmt_ctx, AVMEDIA_TYPE_AUDIO) >= 0){
        audio_stream = fmt_ctx->streams[audio_stream_idx];
        audio_codec_ctx = audio_stream->codec;
    }

上面的一些准备工作完成后,就需要从输入文件中一帧一帧读取数据,并进行解码了。从这里可以看出,需要找到一个 一帧视频存放的地方,为此需要使用av_init_packet初始化一个AVPacket。之后就可以使用av_read_frame来从输入 文件中读取一个 frame。示例代码如下:

1
2
3
4
5
6
7
8
9
10
11
12
13
14
15
16
17
18
19
20
21
22
23
24
25
26
27
28
29
30
31
32
33
34
35
36
37
38
39
40
41
42
43
44
45
46
47
48
49
50
51
52
53
54
55
56
57
58
59
60
61
62
63
64
65
66
static int decode_packet(int *got_frame, int cached)
{
    int ret = 0;
    int decoded = pkt.size;
    *got_frame = 0;

    if(pkt.stream_index == video_stream_idx){
        //decode video frame
        ret = avcodec_decode_video2(video_codec_ctx, frame, got_frame, &pkt);
        if(ret < 0){
            fprintf(stderr, "Error decoding video frame (%s) \n",
                    av_err2str(ret));
            return ret;
        }

        printf("num %d got_frame %d\n", num++, *got_frame);
        if(*got_frame){
            av_image_copy(video_dst_data, video_dst_linesize,
                          (const uint8_t **)(frame->data), frame->linesize,
                          pix_fmt, width, height);

            //write to raw video file
            fwrite(video_dst_data[0], 1, video_dst_bufsize, video_dst_file);
        }
    }else if(pkt.stream_index == audio_stream_idx){
        //decode audio frame
        ret = avcodec_decode_audio4(audio_codec_ctx, frame, got_frame, &pkt);
        if(ret < 0){
            fprintf(stderr, "Error decoding audio frame (%s)\n", av_err2str(ret));
            return ret;
        }

        if(*got_frame){
            size_t unpadded_linesize = frame->nb_samples * av_get_bytes_per_sample(frame->format);
            fwrite(frame->extended_data[0], 1, unpadded_linesize, audio_dst_file);
        }
    }

    return FFMIN(ret, pkt.size);
}

//allocate frame 
frame = av_frame_alloc();
if(!frame){
    fprintf(stderr, "Could not allocate frame\n");
    exit(1);
}

av_init_packet(&pkt);
pkt.data = NULL;
pkt.size = 0;

//read frames from the file
int got_frame;
while(av_read_frame(fmt_ctx, &pkt) >= 0){
    AVPacket orig_pkt = pkt;

    do{
        ret = decode_packet(&got_frame, 0);
        if(ret < 0)
            break;
        pkt.data += ret;
        pkt.size -= ret;
    }while(pkt.size > 0);
    av_free_packet(&orig_pkt);
}

解封装大致流程已经完成了,剩余的是一些收尾工作,例如释放刚刚分配的内存等。

完整实现过程请移步解封在实现.

FFMpeg 转码的实现

FFMpeg 视频缩放实现

针对视频的缩放,FFMpeg 提供了 libswscale 库,可以轻松实现视频的分辨率转换功能。除此之外,libswscale 库还可以 实现颜色空间转换的功能。

FFMpeg 中针对视频的缩放提供了一个示例代码,位于doc\examples\scaling_video.c中。分析该程序的流程大致分为如下几部分:

  1. 解析命令行参数,获取缩放的视频宽高,视频文件名。
  2. 创建SwsContext结构体。
  3. 分配源图像和目标图像的内存。
  4. 将源图像进行转换为目标图像的大小。
  5. 将缩放的图像写到输出文件中。
  6. 收尾工作,释放分配的内存,关闭打开的文件。

首先解析期望的视频宽高,示例代码中使用的是av_parse_video_size函数,该函数的声明如下:

1
int av_parse_video_size(int *width_ptr, int *height_ptr, const char *str);

解析 str,并将解析出来的宽高信息赋值给 width_ptr, height_ptr;其中:

  • str:待解析的字符串,可以是格式为widthxheight的字符串,或者是一个合法的视频大小描述。
  • width_ptr,height_ptr,指向检测到的宽高变量的指针。
  • 返回值,成功返回大于0,失败返回负值。

之后,创建SwsContext结构体,示例代码中使用的是sws_getContext函数,该函数声明如下:

1
2
3
4
struct SwsContext *sws_getContext(int srcW, int srcH, enum AVPixelFormat srcFormat,
                                  int dstW, int dstH, enum AVPixelFormat dstFormat,
                                  int flags, SwsFilter *srcFilter,
                                  SwsFilter *dstFilter, const double *param);

该函数的作用是分配并返回一个SwsContext结构,后面如果需要实现缩放/转换操作时,需要使用sws_scale函数。其中:

  • srcW:源图像的宽
  • srcH:源图像的高
  • srcFormat:源图像的格式
  • dstW:目标图像的宽
  • dstH:目标图像的高
  • dstFormat:目标图像的格式
  • flags:指定了使用何种算法和选项进行缩放

编译时用make examples后生成 scaling_video 可执行文件。命令行如下:

1
$ /scaling_video 001_bit_rv8_64P_352x288.yuv hd1080

注意,输入时 YUV 数据,输出时 RGB 数据,会根据后面的 size 生成不同分辨率的数据。